
I love to make garden art, especially when I have the opportunity to recycle/repurpose items into new treasures for my garden. If you search online, you will find lots of garden art projects with step-by-step instructions that are easy to follow, and the supplies needed for the project can be found locally.
Most require basic skills; however, you may find more advanced projects that require extra time or skills to complete. Don’t be discouraged by those projects; you will find once you try a few things that you are ready to tackle something with a higher degree of difficulty.
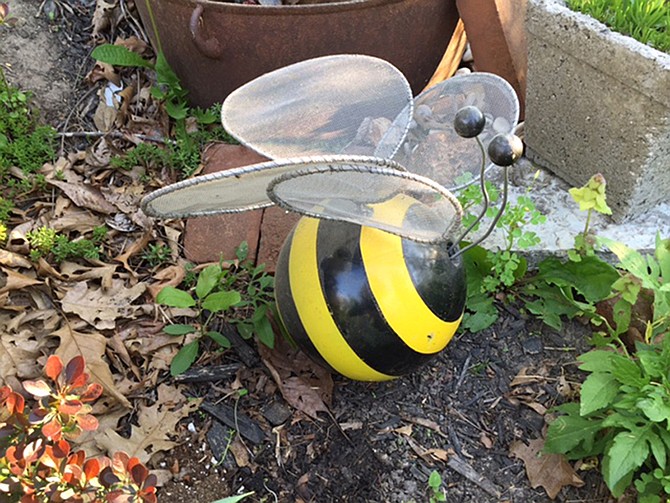
Some websites I visit for inspiration promote reusing and recycling items that are no longer needed for their intended purpose. One example of recycling is using bowling balls to create gazing globes. Gazing globes were standard fixtures in Victorian gardens. They were thought to hold magical, mystical powers and could ward off evil spirits. A bowling ball can be recreated into a gazing globe with just the application of some glass gems (glass pieces with a flat side, found at most craft stores), mirrored glass pieces or old costume jewelry. And you can even create lady bugs and bumble bees out of bowling balls with a little paint and some additional embellishments for antennae or wings. Used bowling balls are easy to find at some of the local thrift stores, usually for $2 or less. This is a great way to breathe new life into an item that would otherwise end up in the landfill.
Gazing globes
To make a gazing globe from an old bowling ball, you’ll need the bowling ball, adhesive (discussed below) and decorations. Follow these steps:
- Sand the finish on the bowling ball lightly so it is not shiny. Clean and dry the surface after sanding.
- Because the bowling ball will be visible in between the decorations you glue on, you may want to paint it first. Use a spray paint made for exterior use.
- To work on the bowling ball, it is best to nestle it in a bowl or flower pot to hold it steady and keep it from rolling around.
- Apply your decorations. Be creative! I have used glass gems, pennies, small round mirror pieces, little plastic bugs and lizards, and small glass mosaic pieces to decorate my gazing globes. It is best that the decorations you use have one side with a flat surface. For adhesive I use a waterproof silicone sealer made for outside use. Look for silicone sealer made for window/door or gutter/flashing applications. Most of the hardware and home improvement stores carry silicone sealer products.
- Due to the curve of the bowling ball, you will need to work on small areas at a time then let them dry or cure before you start on the next area. Your finished creation will be well worth the time and effort it takes to make it.
- As a final step, you can add grout between the glass gems. Use a grout manufactured specifically for outdoor use. The grout gives the gazing globe a mosaic look.
Stepping stones
Another easy garden art project is stepping stones. Children love to make and decorate their own stepping stone and look forward to seeing it and walking on it in the garden.
You will need a plastic plant drainer (available at garden centers and home improvement stores in the garden section), a concrete product (I use vinyl patching compound but other products without aggregate in them will work), vegetable oil, window screen or hardware cloth/chicken wire, and decorations.
- I buy the inexpensive plastic plant drainers as they hold up pretty well and can be used several times. Spray the inside of the plant drainer with vegetable oil, or brush it on — the vegetable oil acts as a release for the concrete product.
- Mix the concrete. You want the mix to have a brownie batter consistency, a little on the dry side versus too wet. There are several products you can use: mortar mix, vinyl patching compound, etc. Make sure you are not using a product with large aggregate in it unless you want a rougher, gravel look for your stepping stone.
- Fill the plant drainer half full with the concrete mix. Cut a piece of window screen, hardware cloth or chicken wire about an inch smaller in diameter than the plant drainer. I use window screen, as it is the easiest to work with. Place the window screen flat on the surface of the concrete mix. Add more concrete on top of the window screen until you are within a half inch of the rim of the plant drainer. The window screen adds extra support and strength to the finished stepping stone.
- Place your decorations on the wet concrete surface, pressing them down slightly so they sit just below the concrete surface. If you get some concrete on the decorations, wait a few minutes then come back and gently wipe the concrete off with a damp sponge. Let the stepping stone dry/cure for 24-48 hours, then remove it from the plant drainer. It is now ready to be placed in the garden. If any of your decorations become lose you can glue them back on with an outdoor silicone sealer.
- As in the bowling ball/gazing globe instructions, you can grout your stepping stone design for a mosaic look.
Creating your own garden art can be a wonderful project for young and old alike and a great way to add color, whimsy and beauty to your garden.
Check out the garden art for sale at the Central Missouri Master Gardeners’ annual plant sale beginning at 7 a.m. May 7 at the Jefferson City Jaycees Fairgrounds.